
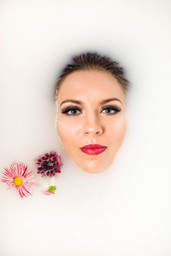
Milk Bath Photoshop Editing
- Natalie Foster

- Feb 4, 2019
- 1 min read


I shot my images in RAW and used natural light and a reflector when photographing the images.

Photoshop Editing Tutorial
Typically I find it useful to duplicate my image so I have a base image to refer back to during editing.
I cropped closer as there was too much negative space.
I increased the brightness, and created a curve to make the whites a little brighter.

Using the dodge tool I brightened the background.
If unsure about which area to make brighter I suggest temporarily turning the image to black and white and lowing the brightness - this allows you to be able to see the tonal scale better so you know which areas need to be brighter.
Next I use the spot healing tool to remove blemishes. And the clone stamp tool to soften fine line (such as under eyes or laugh lines), I do this with a low opacity so the natural lines are still visible but they are minimised.
Lastly using 'dodge' on a low opacity I add highlights to the cheek bones, nose, centre of the lips, irises, and anywhere on the body natural lights would fall.
And 'burn' cheekbones, eyelashes and anywhere on the body where natural shadow would usually fall. I feel that this technique is very subtle but adds much more dimension.

And after processing all of my images in a similar fashion, I transferred them all to Adobe Lightroom and create a preset to warm up the images by using ‘HSL/Colour’ sliders to enhance certain colours.
Typically editing an image it takes between 30 - 50 minutes.
Please view all of my edited photos from this shoot below.


Lighting Diagram: www.lightingdiagrams.com


Comments